The Basics of Avalanche Slope Assessment

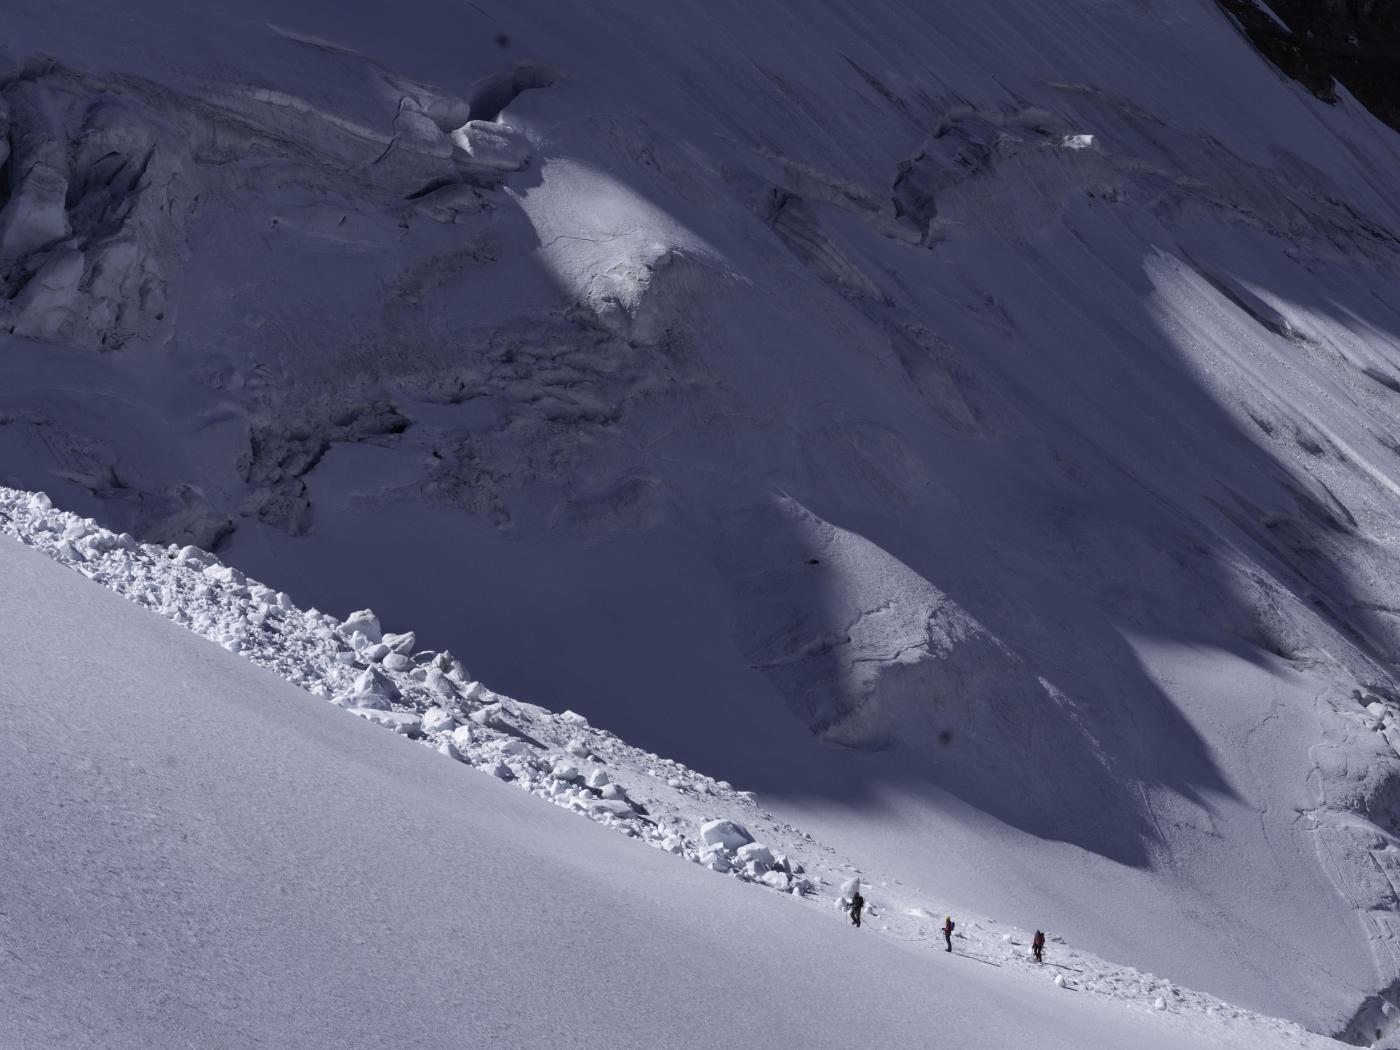
M. Trehearne 2022 - Climbers nearly hit by a combination windslab and serac avalanche on the Ramp Route, Mount Athabasca. Jasper National Park, Canada.
HOW TO ASSESS AVALANCHE SLOPES - Leveling Up
We're all likely going to end up there at some point. Following an often enthusiastic, but very well intentioned partner up an uptrack, into some seemingly monsterous place, tentative and uncertain, lingering in the back of the group, staring upwards into what looks like the gates to oblivion.
One of the biggest challenges our Guides observe in teaching slope assessment with our students, is our collective (in)ability to create simplicity in an assessment process. Given how many factors there are to take in and process with respect to avalanche slopes, a common outcome is that critical observations best viewed in isolation, often become conflated or mixed, reducing our ability to focus on the essential inputs required in the moment or circumstances , before bringing them together in balance to create a clear and realistic picture of the risk we face.
The intention here is to help provide some different insight into a few of the processes our Guides use commonly in assessing and teaching avalanche slope assessment. The desire being to share what we find creates more objectivity, and more clarity when we need it most. For us this represents a process that has been tested, refined, debated, torn down and built back up and it's value reflected back to us by our students in form of their own progression, and the the value and confidence they tell us it creates for them.
Hope it helps!
Adding to your process for slope assessment
It is widely accepted that one of the best support structures in decision making for recreationalists in slope assessment is the Avaluator
The following is not intended to take it's place, but to inspire some additional process methods to help you level up how you view terrain, snowpack and your slope assessments.
1.
DON'T CONFLATE TERRAIN AND SNOWPACK
Firstly, we need to understand what terrain we're exposed to. This takes an eye to develop, but is a critical skill set which allows assessment of its characteristics to be made. The ability to assess terrain underfoot, and all that overhead will be essential. The single most common cause of errors or challenges in avalanche slope assessment we see in our students initially come from a yet un-learned ability to separate the assessments of terrain and snowpack. Conflating these two, commonly causes confusion, and reduces clarity in the critical observations required for both. For an avalanche to take place, specific terrain characteristics are required. Learn these. If the terrain characteristics are not such that they will produce, ie: allow an avalanche to happen, than we almost never waste any time as Guides thinking about the snowpack or its problems, grounding ourselves in the knowledge that the terrain cannot produce.
So, our first tip is this:
Tip #1 - In your minds eye, separate terrain, and the snowpack sitting on top of it. We always consider terrain in isolation, before making any assessments of the snowpack.
More on all the specific terrain characteristics to consider below.
2.
overlay snowpack problems in the terrain
Generally, we tend to feel that only after assessing the terrain in isolation, and concluding it has the required characteristics to produce an avalanche, is it time to assess the snowpack problems which might be present on the slope you're looking at. These are most frequently communicated to us in the Public Avalanche Bulletin (www.avalanche.ca).
We'll dive into this more deeply in the following, but in the meantime, here's our second tip:
Tip #2 - If you believe the terrain can produce, overlay the snowpack and its problems into the terrain and consider then how exposed you want to be to the hazard, or if zero exposure is prefered.
3.
Ask: What size avalanche can the terrain Produce?
After we've confirmed the terrain can produce, and we've validated the presence of an avalanche problem, there's a compairative process we work through. First we look at the path length of the avalanche path in question; for example, if it's 1000m long avalanche path, we'd assume it's capable of producing Sz. 3's. But... we then also need to consider the forecast size of the avalanche problem, and envision how far, and how the terrain shape will influence it's trajectory while the avalanche is in motion. Ultimately, we want to know how far the avalanche will travel through the terrain, which informs our understanding of how exposed we are to that specific avalanche hazard or problem.
Tip #3 - Ask yourself, what size avalanche can the terrain produce. Then using the forecast size of the avalanche problem, consider where and how far it will travel through the terrain in your minds eye. If we understand the size classifications and average path length of avalanches, we will more clearly understand the extent we may be exposed to the avalanche hazard when you compare what the terrain can produce against what the snowpack can produce.
4.
CONSIDER YOUR RISK LEVELS & Decide on reasonable exposure
We could easily take a trip down the rabbit hole here. What one person deems to be reasonable exposure, might be completely bananas in the brain to another. The aim here is simply to have an informed understanding of when or at what points or positions in the terrain do we become exposed - ie: could be potentially hit by the avalanche and the consequences tied to that. To clearly understand the likelihood of an avalanche occurring, where, how far, and with how much destructive potential it will arrive with if it occurs is critical to understanding exposure levels. Just because you're standing in an avalanche path for example, does not expressly imply you are exposed to avalanche hazard.
1. Terrain Assessment
Is it avalanche terrain?
After identifying the terrain we are exposed to, the first question in assessing a slope is: "is this avalanche terrain?"
To qualify a slope as avalanche terrain, or capable of producing an avalanche, we generally fall back on one of the primary support structures for decision making in avalanche terrain, taught on our AST1 & AST2 Courses;
The single most relevant factor that indicates avalanche terrain is slope angle. Ie: how steep is the slope.
Typically, slopes less than 28˚ will not produce avalanches. That said, it's not uncommon to hear our Guides suggest that 25˚ slopes produce. Therefore, if you are not exposed to 25˚ or steeper terrain, you're likely not in avalanche terrain. Anything steeper than 28˚ however you can assume will produce, with most slab avalanches occurring between 28˚ and 48˚, and loose snow avalanches becoming most frequent in steeper terrain.
With a slope angle that tells us we're looking at avalanche terrain, other inputs in the ATES Technical Model, give us basis for more in depth assessment of the slope. These additional terrain parameters often don't on their own confirm a slope as avalanche terrain, however they do influence the likelihood of triggering, increase the potential consequences of an avalanche involvement, and/or inform our potential exposure levels.
2. How to overlay avalanche problems in terrain
Interpreting the Avalanche Problems in the Public Avalanche Bulletin and Overlaying them in the Terrain
To have an ability to apply snowpack problems to avalanche terrain we will need to be able to distinguish between different elevation bands, and have an ability to identify the slope aspect. Where you are standing in relation to an avalanche avalanche problem you've located in the terrain is a critical element that informs what we understand our risk levels to be. If we understand and can identify different elevation bands, and slope, the first two inputs listed in any avalanche problem in the Public Avalanche Bulletin will help us understand whether it is present in a given location.
Which Elevation?
+
Which Slopes
If we use the info from the example shown, it tells us:
- There is a "Deep Persistent Slab" Problem which can produce avalanches.
- The avalanche problem exists at Treeline, and in the Alpine.
- The avalanche problem exists on all aspects.
So, with respect to snowpack problems, you can assume that if you're looking at a slope that is in either the alpine or at treeline, and has the terrain characteristics to produce, the slope is home to the above mentioned avalanche problem / hazard. We can assume with reasonable confidence the problem is present.

3. ASK: What size avalanche can the terrain & snowpack produce?
What Size avalanche can the terrain produce?
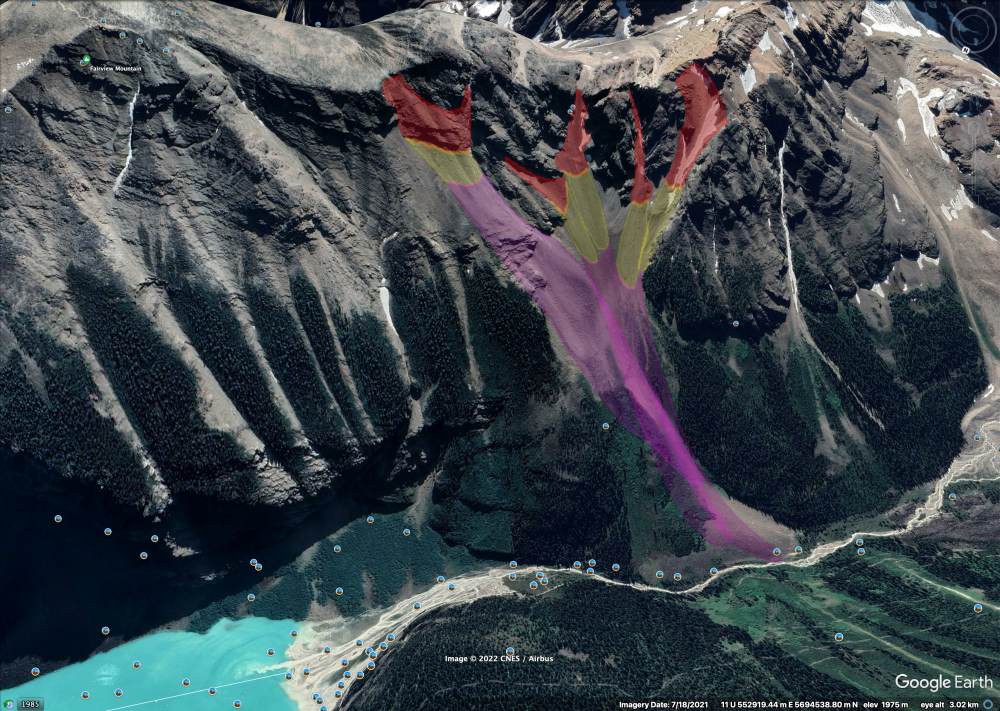
Using Google Earth, we've mapped out a few of the upper start zones on one of the most popular ski touring circuits in Lake Louise, Alberta; The Surprise Pass Circuit. We've noted 5 major start zones on the main descent line in RED. To determine what size avalanche each of these paths can produce, we've used the "path" tool in Google Earth to measure the length of each avalanche path from the start zones in RED, to the end of the runout zone in the valley bottom. The conclusion? The avalanche path is long enough to produce Sz 3 avalanches on average.
What Size avalanche can the avalanche problem (snowpack) produce?
Understanding what size avalanche can be produced by a given avalanche problem (layer in the snowpack), is information communicated directly to us in the Public Avalanche Bulletin. This is the:
Expected Size
Understanding where an avalanche will travel through avalanche terrain relies on our ability to estimate distances within the avalanche path correctly, or to pre-measure these distances using digital route planning work. It also relies on our ability to envision how the terrain features will, shape, confine, or change the trajectory of an avalanche. In this image each of the RED, YELLOW, and PINK zones have been measured and marked to show the likely run distance of different size avalanches.
RED: Size 1's
YELLOW: Size 2's
PINK: Size 3's
These color coded areas are based on the knowledge that a Size 1 avalanche typically has a path length of on average 10 meters. Size 2 avalanches on average will run for 100 meters, and Size 3 avalanches on average 1000m.
understanding your exposure